Organize your workspace with ease!

Tired of searching through cluttered channels? Say hello to a more streamlined work experience with our latest update in the workspace!

Add new folders to organize items for your team:

Simply clicking New Folder button on the top right of the page, you can manage screenshots and screen videos for your team like a pro. Plus, with the new ability to upload directly from your computer,  you can also share all kinds of images and videos with your team, not just screenshots and screen videos.

Review team activities in one place:

Easily track updates and review your workspace’s history by accessing the activity feature located in the navigation bar right after Settings. You can also view all changes made to a specific channel by checking the Activity tab on the top right of each channel’s page. Stay on top of all changes and updates with our new activity feature!

Update your profile to show who you are!:

Simply hovering your avatar,  you’ll have quick access to update your profile picture, name, and basic information. This time-saving feature ensures that your profile accurately reflects who you are. Make a great first impression and keep your profile up-to-date with our latest profile editing feature!

Can’t wait to try? Sign in to your Workspace now for free

Your feedback matters to us! We’d love to hear your thoughts on our updates. Please share your suggestions in the comments section below. Your input helps us continue to improve and provide you with the best product experience. Thank you!

Workspace: a collaborative visual repository for your team

Introducing Workspace, a new approach to help your team collaborate visually.

Over the past years, many companies have adapted video conferencing as an essential for communication across teammates. Despite virtual meetings allowing us to talk in real-time, conflicting schedules and endless meetings can be daunting. Sometimes you may not always need immediate feedback from a colleague, or it’s easier to clear up confusion with illustrations rather than long emails. Why not integrate Awesome Screenshot Workspace in your workflow?

What is Workspace? 

Workspace is a central repository for all your team’s visual content. All in one: everything you need for visual communication at work:

  • Record an online meeting for a colleague who could not attend.
  • @colleague in the comment section to start a discussion
  • Send a quick video message to team members.
  • Upload a how-to tutorial for new members.
  • Share an expressive screenshot with stakeholders.
  • Edit a record, polish screenshots, and more into a workspace. 

We would love to hear how you think about our updates. Feel free to share your thoughts or suggestions with us in the comment section below. Thanks!!😀

Beautify your screenshots

We are thrilled to unveil our new powerful toolbar with expanded feature sets.👏

🙌New Color Palette : Color Picker+Hex Code+Morandi Color

Can’t find your favorite color? Want to match your logo color? No worries! With our new color picker, you have endless color options. Go with your color.

🔑Image Watermark : Visual Signature on Your Screenshots

Wish to protect your screenshots from unauthorized use? Need a signature on your captures? Want to add personal branding? Now, you can add a watermark on your screenshots with our toolbar.

🎉Customizable Padding/Browser : Polish up Screenshots

Add padding or browser to make your screenshots look more professional.

Padding

Browser/URL

💬More Text Settings : Stroke Color + Shadow

Sometimes annotations blend in screenshots with heavy texts and complicated design. Change stroke color or add a shadow to make your annotation more visible.

How to Access New Toolbar

We would love to hear how you think about our updates. Feel free to share your thoughts or suggestions with us in the comment section below. Thanks!!😀

What’s New in 4.3.33

We are thrilled to announce our latest extension updates!

We have made some improvements on screenshots to bring you an immersive capturing experience.

Optimized Visible Part Capturing
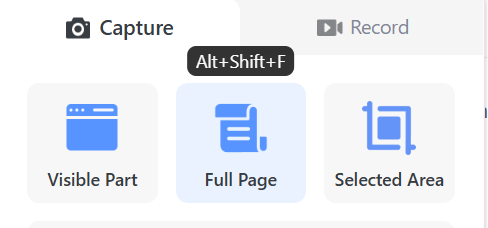
Previously you can run our extension on almost any webpages except pages like Chrome extension store or some setting pages. With our latest version, you will get a best-in-class capture experience. The new capturing visible part feature works on Every Web Page. Give it a try yourself.

Enhanced Full-Page Capturing
Full Page capture is one of our most popular and essential features. We fixed some bugs and issues you reported, giving you a smoother capturing entire page experience.

Introducing a More Intuitive Default Menu Tab
Some people solely need recording or capturing features. They can change the default menu tab in the options setting. As for people who utilize both capture and record features or their preferences change often. Instead of going through a tedious setting process, your extension will automatically remember the last tab you use and make it a default tab next time. Prefer the older way? No problem, you still have the option to set the default tab yourself.

We would love to hear how you think about our updates. Feel free to share your thoughts or suggestions with us in the comment section below. Thanks!!😀

Add Blur and Image to Video

In this update, we want to introduce two new features about video editor and a major improvement on the full-page screenshot function.  

Blur out parts of a video

Sometimes, you’d notice information you cannot or prefer not to share after recording. It could be some confidential information that has to be hidden, or something that may distract viewers’ attention away from what you intend to present. In such situations, blurring out parts of a video can be really helpful.

Wondering about the how-to? Click here to see a step-by-step guide.

Add image to a video

With the add-image feature, you can put a logo to your video to make it more professional, add a reference image to help viewers better understand the content, or add some funny pictures to make a video more entertaining, etc.

You can add images in JPG or PNG format. See how to add an image to your video here.

Enhanced full page screenshot

A new method was used to improve the performance of capturing full page. Previously, when you took a screenshot of a complex webpage that had inline frames or scrollable areas, you might get only the visible part captured or the screenshot was not properly stitched. With the new solution, capturing full page works much better on these kinds of webpages. If you still have trouble capturing the entire page of a webpage, please don’t hesitate to report it to us.

Your valuable feedback help us serve you better. Let us know your thoughts!

🚀New: Emoji, Video Comment and Dark Mode

This update includes some improvements to the video interaction and browsing experience. Please see details below.

Quick Reply with Emoji

On a video page, there are several pre-selected emojis available. You can quickly reply to a video message by choosing an emoji or a few emojis to express how you feel about the video.

Comment on Video

A comment feature was added to make communications through videos more effective. When you receive a shared video link, you can leave a comment to the sender on the right side of the video page. Anyone with the share link can comment on the video, so you can join a discussion and reply to other people’s comments as well.

Dark Mode

Dark mode is supported now. You can go to Appearance within your Settings to switch between light theme and dark theme. You can also set it to comply with your system setting by choosing “Use device theme”. To get there, please click on your avatar in the top right corner and then click Appearance.

Customize Avatar

You can also customize your avatar within settings, by either uploading an image or using your Google account avatar.

Please contact us if you have any questions or suggestions. We’d love to hear your thoughts!

New: Cut and Annotate Your Video

We want to introduce a new feature that helps make your videos more custom and professional: video editor. This version of editor contains several basic yet useful editing tools, with more to come in the future!

Cut out unwanted parts

Have you experienced a situation where you have to discard a recording and redo because of getting interrupted or not satisfied with what’s just recorded? Redo recording can be both frustrating and time consuming. But from now on, when such an issue occurs, you can just pause for a moment, make adjustments and proceed with recording as usual. Once the recording is done, use the cut tool to remove unwanted parts easily.

Annotate with text, shapes and links

Sometimes, new thoughts may pop into your heads after you finish recording a video. With the text tool, you can share a new idea, add a description or an explanation by adding a note to a specific part of your video, and to a specific place in a video scene.

If you want to emphasize something in your video, you can add a rectangle, ellipse or arrow to highlight it. You can also use shape tool along with text tool to draw viewers’ attention to the parts you want to focus on.

If you want people who watch your video to visit a particular page, or to prove some resource links for people’s reference, make use of the link tool.

Get started with the video editor

Please refer to this article to see how to use the video editor in detail and feel free to contact us if you need assistance.

Video editor is only available for videos stored on our website. To use it, make sure you are signed in and choose the Cloud storage option for your video. You will see the Edit button on a video detail page after you stop recording.

If you saved videos to the Local recordings list previously, you can go there to open a video and upload it to our website.

Note: video editing is a paid feature. However, it is now free to everyone for a limited time.

Get screenshot done QUICKLY

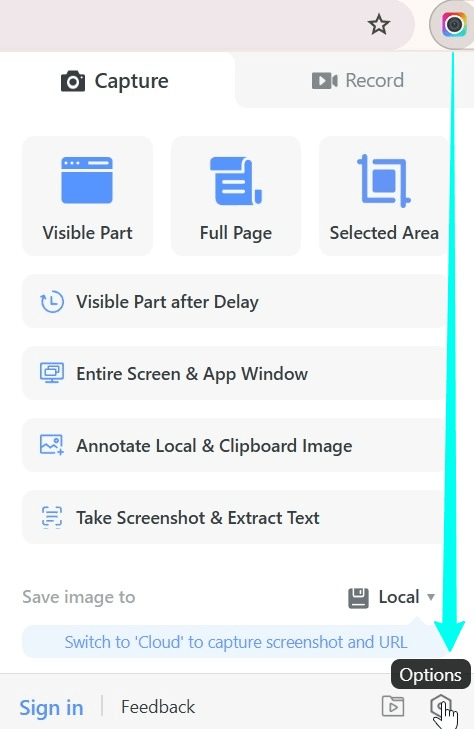
In this release, you will notice a new option available in the extension’s Capture menu.

Once the “Cloud” option is selected manually, you will get new “Capture screenshot” experience. Almost everything is quicker compared with the previous process. Here is a screenshot of the new annotation interface.

Annotation tools and save options are combined into one menu, which will appear on the right side of your screen after you take a screenshot. Icons for annotation tools were redesigned, too. Tooltip text will show up when you mouse over an icon. With the new process and annotation menu, you will get screenshot done quickly.

Quick to Annotate

Previously, a screenshot was automatically displayed in a new tab for annotating or saving.  Now, you can annotate directly on the page without leaving it.

Quick to Copy

Now you can directly copy a screenshot to your clipboard and paste it anywhere without going through the whole process.

Quick to save screenshot with the source URL

By clicking the Save button, you can upload a screenshot with annotations to your account quickly. The URL and title of the web page you capture will also be saved automatically, so that you can click the image title to revisit the source page later.

Quick to Share and Organize

Once screenshots are saved in the cloud, they can be accessed across devices, shared through links, organized with folders, or downloaded as images or PDFs.

Only one image for a very long full page screenshot

Since we can use the power of the server side computing in the cloud mode, you will get only one image when capturing full page of a very very long page. Previously, you may get several divided images for a very long full page screenshot.

Screenshots and Screen recordings, together

Screenshots and videos saved in your account can be organized in the same folder. It could be really useful if you’re preparing resources for a project and need these two kinds of files.

Still like the old way? Don’t worry.

To those who prefer saving image to local, you can click the triangle icon next to Cloud to switch back to Local. The process of saving screenshots to local remains the same as before.

To those who don’t have an account yet, we strongly recommend you register an account to try the cloud screenshot feature!

There are more improvements to come. If you have any questions or suggestions, feel free to to send us a message using Feedback button or blog comments. Let us know your thoughts! Thank you for reading.

Annotation tools for video recording

We’re releasing a new feature — Annotation tools for video recording — in this update. Below is a brief introduction.

A new option “Show Annotation Tools” is added to the Record menu. When it’s turned on, a toolbar will appear in the lower left corner of your screen during recording. With those tools, it will be much easier to help your audience pay attention to the most important part of the video.

  • Mouse Pointer Highlight

You can get a yellow circle background around your pointer to make it more visible, or a red circle animation to show your mouse click action, or a spotlight effect to focus on a specific area. See how it works below.

  • On-screen Annotation

With annotations tools, you can draw on your screen, add shapes to key points to make it easier for your audience to follow along.

This new feature is included in the Professional plan, and available for free trial to those who meet the requirements. For more details, check out the latest pricing plans.

We hope you love this update. As always, we are all ears. Don’t hesitate to let us know if you have any questions, comments or suggestions.

Introducing New Website

Over the past few months, the number of recordings and screenshots uploaded to awesomescreenshot.com  has increased a lot and this led to the need for a better way to organize videos and images, on which we’ve been working recently. Today, we’re launching the new website redesigned to enhance your experiences with organizing, finding and sharing your videos and images.

What’s new in this change? Please see the details below.

Fresh Design

A new look with a navigation menu on the left that aims to help you find what you need more easily and quickly.

Nested Folder

Folders and subfolders can keep your items organized in multiple levels. You can now manage your videos and images by adding them to or moving them between folders.  

Search 

In addition to searching images, searching videos and folders are also supported now. Just type keywords in the search field at the top of the site to find things you need.

Trash Folder

We receive file recovery requests from time to time, so we added a trash folder. Removed items will be stored in the trash folder for 3 days for free users. You can undo your accidental deletion from now on. And for premium users, removed items will be stored for up to 30 days!

Video Editing (coming soon)

We’re working on some video editing features such as trim, cut, adding text or link etc. They’ll be released soon. Stay tuned!

We hope you enjoy this new version.  Let us know if you have any questions or feature requests. You can always contact us through the feedback button next to your avatar.